Hostinger Review in India
Choosing the best hosting provider in India is a critical decision for beginners due to its foundation impact on website performance, security, reliability, customer support, and overall user experience (UI). Choosing the best and right hosting is very important for individuals as well as businesses, as it directly impacts the success of your online presence and business operations. So in this article, we are going to one of the best and cheapest hosting for both beginners and advanced bloggers.
I am using Hostinger hosting since 2019, still, now I haven’t faced any problems with this hosting provider. Hostinger is mainly known for its affordability (never compromise), user-friendly & beginner-friendly interfaces, and also has a range of features that can improve your hosting experience. Here are some of the best things about Hostinger hosting
Hostinger Features (Best)
How to Buy Hosting from Hostinger Website
How to Buy Hosting from Hostinger.in: A Step-by-Step Guide
Choosing the right web hosting provider is crucial for the success of your website. Hostinger is known for its affordable and reliable hosting services. This guide will take you through the process of purchasing hosting from Hostinger.in website. just follow and proceed.
Step 1: Visit the Hostinger Website
Step 2: Choose Your Hosting Plan
Hostinger offers several hosting plans, including:
- Shared Hosting: Ideal for small to medium-sized websites.
- Cloud Hosting: Great for larger websites that require more resources and capability.
- VPS Hosting: Perfect for websites needing dedicated resources.
- WordPress Hosting: Optimized for specially WordPress websites.

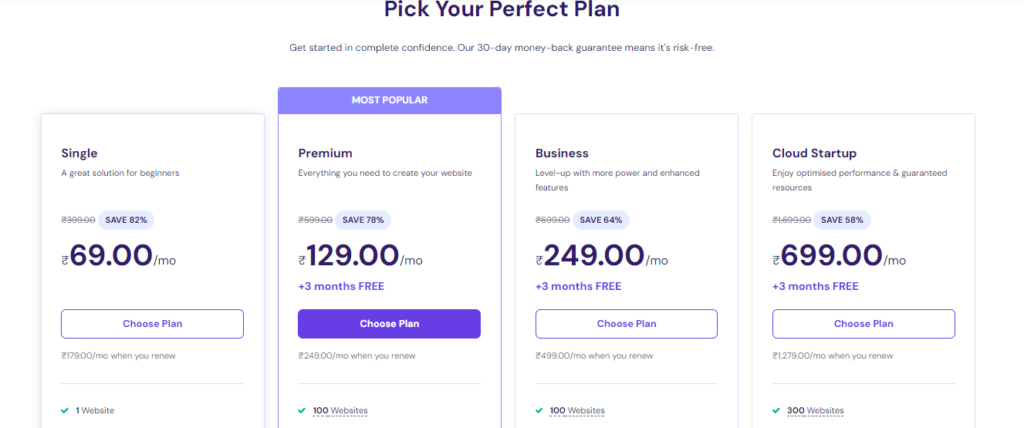
Browse through the options and select the one that best suits your needs. For most beginners, the shared hosting plan is a good starting point.
Step 3: Select a Package
Once you’ve chosen your hosting type as your choice, you’ll need to select a specific package. Hostinger typically offers multiple tiers within each hosting type. For example, shared hosting often has Single, Premium, and Business, Cloud Startup plans. Click on “Choose Plan” for the package you want.

Step 4: Select Your Plan Tenure
Before proceeding to checkout, You need to select plan tenure. Hostinger providing 3 types of tenures like 12 months, 24 months, and 48 months. so choose plan tenure as per your choice. I always recommend 48 months plan because it saves lot of money.

Step 6: Create an Account or Log In
If you’re a new user, you’ll need to create an account. Enter your email address and create a password. If you already have an account, simply log in with your existing credentials.

Step 7: Complete the Payment
Hostinger supports various payment methods, including UPI, credit/debit cards, PayPal, Net banking and even cryptocurrencies (Coingate). Choose your preferred payment method and enter the necessary details to complete the purchase.

Bonus Step:
Enjoy up to 10% off on your choosing plan with our exclusive coupon code. After applying this coupon, you will get up to 10% Flat Discount on your total price.
Coupon Code
CHAKRIWEB

